12.1. Digital I/O
This chapter introduces the use of mPython Board I/O pins for digital input and output. These I/O Pins are to be connected to external devices in order to communicate. The mPython Board can expand through the mPython Expansion Board I/O pins to control or read external components or modules.
Attention
Except P2, P3, P4, P10 (only digital input), other pins can use digital input and output mode. For details, refers to mPython Board Pins Description .
12.1.1. Digital Input
First, start with how to read the digital input of the pin. Pressed the built-in Button A of the mPython Board as input:
from mpython import *           # import mpython module

p5=MPythonPin(5,PinMode.IN)     # Instantiate MPythonPin and set the Button A pin (P5) to "PinMode.IN" mode

while True:
    value=p5.read_digital()      # Read digital input of P5 pin
    oled.DispChar("Button_a:%d" %value,30,20)   # Display the read value on the OLED
    oled.show()                                  # Refresh
    oled.fill(0)                                 # Clear screen
Note
At this time, you can press button a to see the readings of “pressed” and “not pressed”. Because the button a circuit is pulled up, the output is high when “not pressed”, and low when “pressed”.
from mpython import *
p5=MPythonPin(5,PinMode.IN)
Import the mPython module prior to use.
Instantiate the pin object and set the mode. Here, to use MPythonPin(pin, mode=PinMode.IN,pull=None) class.
pin is needed in order to access. If mode is not specified, then default is PinMode.IN . If pull is not specified, then the default is None .
p5.read_digital()
Note
Use read_digital(), returns the level value of the pin. high level (1), low level (0).
12.1.2. Digital output
The following is a simple drive to flash external LED lights:
from mpython import *           # import mpython module

p0=MPythonPin(0,PinMode.OUT)     # Instantiate MPythonPin and set P0 to "PinMode.OUT" mode

while True:
    p0.write_digital(1)          # P0 write high level
    sleep(1)                     #  delay
    p0.write_digital(0)          # P0 write high level
    sleep(1)                     #  delay
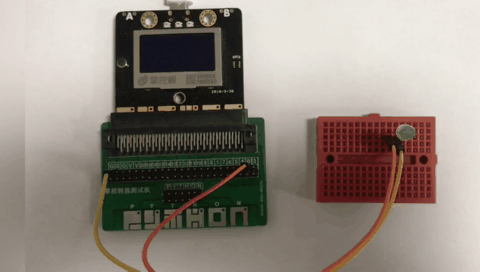
materials, connection mode
Above you need to use a breadboard, 1 LED light, mPython expansion board, DuPont cable. The positive pole of the LED light is connected to the P0 pin of the control board, and the negative pole of the LED light is connected to the GND of the mPython Board.
p0=MPythonPin(0,PinMode.OUT)
Note
MPythonPin Instantiation. mode set as PinMode.OUT digital output mode.
Write high and low level to P0 pin:
p0.write_digital(1)
p0.write_digital(0)
Note
Use write_digital(value) method to write high and low level to the pin. Where value is level value, “1” as high level, “0” as low level.
12.1.3. External Interruption
What is interruption?
In the process of running the program, the system has a situation that must be dealt with by the CPU immediately. At this time, the CPU temporarily suspends the execution of the program and turns to deal with this new situation. When there is a need, the CPU must suspend its operation and process other matters, and then go back to execute the suspended thing after processing.
When the input pin changes in level, a hardware interrupt is triggered, and the trigger executes the interrupt processing function. You can define a callback function to do some interrupt response work. The use of pin interrupts is essentially the same as the a and b key interrupts of the control board.
The following uses the built-in Button A ((P5 pin) of the control panel as an input interrupt. When the Button A is pressed to activate the buzzer:
from mpython import *           # import mpython module
import music                    # import music module
p5=MPythonPin(5,PinMode.IN)     # Instantiate MPythonPin, set P5 as "PinMode.IN" mode

def BuzzOn(_):                    # Define interrupt callback function
    music.play(music.BA_DING,wait=False)

p5.irq(trigger=Pin.IRQ_FALLING,handler=BuzzOn)            # Set P5 pin for callback interruption function.
Hint
Effect and Time button_a.irq() is the same when the button is interrupted, The interruption of button_a is also the method of using Pin.irq .
We first instantiate MPythonPin and configure the P5 pin as PinMode.IN
p5=MPythonPin(5,PinMode.IN)
Define callback function:
def BuzzOn(_):
    music.play(music.BA_DING,wait=False)
Note
Callback function, to contain a parameter, Otherwise it cannot be used, the above BuzzOn() defines the callback function, the parameter is _, you can define this parameter arbitrarily.
Finally we need to tell when the pin is triggered and the function to call when an event is detected:
p5.irq(trigger=Pin.IRQ_FALLING,handler=BuzzOn)
Note
We set P5 to only trigger Pin.IRQ_FALLING on the falling edge (when it changes from high level to low level). Set callabck function
handler=”define the callback function for interruption handling”. For details, refers to MPythonPin.irq 。