mpython — mPython Board related built-in functions
mpython a proprietary module packed with built-in resources and functions. For details, refers to mpython.py源码 。
Delay
-
mpython.sleep(s)
Second time delay
s- unit in second.
-
mpython.sleep_ms(ms)
Millisecond time delay
ms-unit in millisecond.
-
mpython.sleep_us(us)
Time delay
us-unit in microsecond.
Mapping
-
mpython.numberMap(inputNum, bMin, bMax, cMin, cMax)
Mapping function,parameter:
inputNumFor variables require mappingbMinThe minimum value require for mappingbMaxThe maximum value require for mappingcMinMinimum valuecMaxMaximum value
Built-in sensors
Sound, Light
-
light.read()
Read Light Sensor value, range 0~4095。
-
sound.read()
Read Sound Sensor (microphone) value, range 0~4095。
Accelerometer
Through the accelerometer object, you can get the 3-axis accelerometer value in g. range:±2g/±4g/±8g/±16g, default at ±2g。
-
accelerometer.get_x()
Get the acceleration measurement value on the x-axis, positive or negative integer, depending on the direction.
-
accelerometer.get_y()
Get acceleration measurement value on y-axis, positive integer or negative integer, depending on direction.
-
accelerometer.get_z()
Get the acceleration measurement value on the z axis, positive integer or negative integer, depending on the direction.
-
accelerometer.set_range(range)
Set the acceleration range if not modified, default range is ±2g.
The acceleration range constant value is follows:
Constant Value Definition RANGE_2G 0 range ±2g RANGE_4G 1 range ±4g RANGE_8G 2 range ±8g RANGE_16G 3 range ±16g
-
accelerometer.set_resolution(resolution)
Set acceleration resolution, default is 10bit resolution。
The resolution constant value is follows:
Constant Value Definition RES_14_BIT 0 14 bit resolution RES_12_BIT 1 12 bit resolution RES_10_BIT 2 10 bit resolution
-
accelerometer.set_offset(x=None, y=None, z=None)
This function is used to calibrate the acceleration value deviation of the three axes (x, y, z) of the accelerometer. Under normal circumstances, no calibration is required, only amend when there is large acceleration deviation.
Note that the calibration data will not be saved after power off. x, y, z is the adjustment deviation value, the correctable range is ±1g.
-
accelerometer.roll_pitch_angle()
Return the Euler Angle (roll , pitch ) calculated by the accelerometer. Note that yaw requires angular velocity, so it cannot be measured. Returns 2 tuples (roll,pitch) in unit Angle.
Assume that the control panel is an aircraft:
- Roll Angle refers to the included Angle between the plane where the two wings of an aircraft are located and the parallel line. The right roll of the aircraft body is positive and the range is [-180,180]..
- The pitch Angle refers to the Angle between the nose and the horizontal plane, which is 0 when the plane is parallel and positive when the plane is up, with a range of [-180,180].
Attention
Only by 3 axis acceleration calculation method, only applicable to static, only gravity measurements. In practice, there are other acceleration disturbances, such as vibrations.
Motion detection event
Provides a variety of plane tilt, flip, click (similar to mouse click), drop motion posture events. The user can pre-set the callback function and trigger the event callback when the event occurs. The callback function is defined as,function_callback(event)。event Parameter is the corresponding event constant.
-
accelerometer.event_tilt_left
tilt to the left
-
accelerometer.event_tilt_right
tilt to the right
-
accelerometer.event_tilt_up
tilt to the up
-
accelerometer.event_tilt_down
tilt to the down
-
accelerometer.event_face_up
face up
-
accelerometer.event_face_down
face down
-
accelerometer.event_single_click
A single click, similar to a mouse click.
-
accelerometer.event_single_click
Click twice in a row, similar to the double-click operation of the mouse.
-
accelerometer.event_freefall
fall
event define:
EVENT 值 accelerometer.TILT_LEFT 0 accelerometer.TILT_RIGHT 1 accelerometer.TILT_UP 2 accelerometer.TILT_DOWN 3 accelerometer.FACE_UP 4 accelerometer.FACE_DOWN 5 accelerometer.SINGLE_CLICK 6 accelerometer.DOUBLE_CLICK 7 accelerometer.FREEFALL 8
1 2 3 4 5 6 7 8 9 10 11 12 13 14 15 16 17 18 19 20 21 22 23 24 25 26 27 28 29 30 31 32 33 34 35 36 37 38 39 40 | # The MIT License (MIT)
# Copyright (c) 2020, Tangliufeng for labplus Industries
# accelerometer event simple example
from mpython import *
def motion_callback_function(event):
""" 运动事件回调函数 """
if event == accelerometer.TILT_LEFT:
print("tilt left")
elif event == accelerometer.TILT_RIGHT:
print("tilt right")
elif event == accelerometer.TILT_UP:
print("tilt up")
elif event == accelerometer.TILT_DOWN:
print("tilt down")
elif event == accelerometer.FACE_UP:
print("face up")
elif event == accelerometer.FACE_DOWN:
print("face down")
elif event == accelerometer.SINGLE_CLICK:
print("single click")
elif event == accelerometer.DOUBLE_CLICK:
print("double click")
elif event == accelerometer.FREEFALL:
print("freefall")
# 事件回调注册
accelerometer.event_tilt_up = motion_callback_function
accelerometer.event_tilt_down = motion_callback_function
accelerometer.event_tilt_left = motion_callback_function
accelerometer.event_tilt_right = motion_callback_function
accelerometer.event_face_up = motion_callback_function
accelerometer.event_face_down = motion_callback_function
accelerometer.event_single_click = motion_callback_function
accelerometer.event_double_click = motion_callback_function
accelerometer.event_freefall = motion_callback_function
|
Magnetometer
MMC5983MA magnetometer function interface, which can obtain 3-axis geomagnetic induction intensity, geomagnetic field intensity, and electronic compass angle.
Attention
The MMC5983MA magnetometer is only available for mPython Board version v2.0 and above!
-
magnetic.get_x()
Obtain the x-axis magnetic induction value, positive or negative integer, range ±8191, unit mG (milliGauss).
-
magnetic.get_y()
Get the magnetic induction value of the y-axis, positive integer or negative integer, range ±8191, unit mG (milliGauss).
-
magnetic.get_z()
Obtain the magnetic induction value of the z axis, positive integer or negative integer, range ±8191, unit mG (milli Gauss).
-
magnetic.get_field_strength()
Returns the calculated magnetic induction value, which is the sum of the three-axis magnetic force. Calculation formula, square root of x^2+y^2+z^2.
-
magnetic.peeling()
Magnetic peeling. Similar to the peeling function of electronic scales, after peeling() , the next time get_field_strength() returns the value calculated after subtracting the current magnetic value.
-
magnetic.clear_peeling()
The magnetic peeling function is cancelled. After using peeling() , you can use this function to resume normal geomagnetic measurement.
-
magnetic.get_heading()
Obtain the angle of the electronic compass, that is, the angle between the re-orientation and the magnetic north pole, directly above the mPython Board, that is, the USB position is regarded as true north. Angle in degree, range 0~360。
Attention
Because there is no z-axis tilt compensation in the angle calculation, when using get_heading() to read the compass angle, the control board should be kept horizontally placed!
Attention
For accurate compass angle, please make sure there is no strong magnetic field interference or calibrate() calibration before use.
-
magnetic.calibrate()
Electronic compass calibration. When there is strong magnetic interference around the control panel, you can use this function to clear the strong magnetic component to calculate the accurate north declination of the geomagnetic field. Note that the calibration offset value is not saved after power off。
Calibration method, follow the instructions on the display of the mPython Board:
- The mPython Board is placed horizontally and rotates several times on the horizontal plane, the process is about 15 seconds.
- The mPython Board is placed vertically and rotates several times along the axis perpendicular to the ground, the process is about 15 seconds.
1 2 3 4 5 6 7 8 9 10 11 12 13 14 15 16 17 18 19 20 21 22 23 24 25 26 27 28 29 30 31 32 33 34 35 36 37 | # The MIT License (MIT)
# Copyright (c) 2019, Tangliufeng for labplus Industries
# 掌控板磁力计Magnetic应用--指北针
from mpython import *
import math
# 绘制罗盘中心坐标和半径
xc,yc,r= 64,32,30
def draw_heading(angle):
"""绘制磁北指针"""
global xc,yc,r
angle = 360 - angle
am = math.pi * 2.0 * angle / 360
xm = round(xc + r * math.sin(am))
ym = round(yc - r * math.cos(am))
oled.line(xc, yc, xm, ym, 1)
# 电子罗盘校准
magnetic.calibrate()
sleep(2)
oled.DispChar('指北针',0,0)
# 绘制罗盘轮廓
oled.circle(xc, yc, r+1, 1)
oled.show()
while True:
# 获取磁力计电子罗盘角度
angle = magnetic.get_heading()
# 清除指针
oled.fill_circle(xc, yc, r, 0)
# 显示罗盘指针
draw_heading(angle)
oled.show()
print("磁北极夹角: %d" %angle)
|
BME280
BME280 is an environmental sensor with integrated temperature, humidity, and air pressure. With high precision, multi-function, compact and other unique characteristics。
- Temperature detection range:-40℃~+85℃,resolution 0.1℃,tolerance ±0.5℃
- Humidity detection range:0~100%RH,resolution 0.1%RH,tolerance ±2%RH
- Pressure detection range:300~1100hPa
- Humidity measurement response time:1s
Attention
The mPython Board scans the I2C bus for 0x77 (119) I2C devices to determine whether to construct the bme280 object!
-
bme280.temperature()
Returns the temperature value in degrees Celsius。
-
bme280.pressure()
Returns the atmospheric pressure value in Pa.
-
bme280.humidity()
Return to ambient humidity, unit in %。
button_[a,b] object
The Button A and B on the mPython Board. button_a/button_b is Button class instance Objects. use machine.Pin.irq Interrupt implementation. define
event_pressed and event_released Button press, release event. Users can easily implement event callbacks. In addition, it also realizes the current or past key status, key times and other functions.
-
class
mpython.Button(pin_num, reverse=False)
Button class
pin_num- IO pin numberreverse- default, reverse is False. Suitable for triggering low level keys. If the trigger is a high level key, set reverse to True, and then reverse.
button_a、button_b instance:
button_a = Button(Pin.P5)
button_b = Button(Pin.P11)
When a key event occurs, an event callback is triggered. callback function define, function_callback(pin), pin is machine.Pin obj.
-
Button.event_pressed
Button press event.
-
Button.event_released
Key release event.
1 2 3 4 5 6 7 8 9 10 11 12 13 14 15 16 17 18 | # The MIT License (MIT)
# Copyright (c) 2020, Tangliufeng for labplus Industries
# 按键事件回调简单的示例
from mpython import *
def on_button_a_pressed(pin):
""" a键按下事件回调函数 """
print("按键A,按下了。")
def on_button_b_pressed(pin):
""" b键按下事件回调函数 """
print("按键B,按下了。")
# 按键事件注册
button_a.event_pressed = on_button_a_pressed
button_b.event_pressed = on_button_b_pressed
|
-
Button.value()
Gets the button pin level status. 1 is high level, 0 bit low level.
>>> button_a.value()
>>> 1
>>> button_a.value()
>>> 0
-
Button.is_pressed()
Returns whether to currently hold. True means that the key is pressed, while False is not pressed.
-
Button.was_pressed()
The return True or False indicates whether the button has been pressed since the device started or since this method was last called. Calling this method clears the pressed state, so the button must be pressed again before True can be returned again.
-
Button.get_presses()
Returns the total number of keystrokes run and resets the total to zero before returning.
-
button_[a,b].irq(handler=None, trigger=(Pin.IRQ_FALLING | Pin.IRQ_RISING), priority=1, wake=None)
Configure the interrupt handler to be called when the trigger source of the pin is active。
Parameter:
handleris an optional function that is called when the interrupt is triggered.
triggerconfigures events that can trigger an interrupt. Possible values are:
Pin.IRQ_FALLINGFalling edge interruptPin.IRQ_RISINGRising edge interruptPin.IRQ_LOW_LEVELLow level interruptPin.IRQ_HIGH_LEVELHigh level interruptThese values can be used to perform
ORoperate together to trigger multiple events.
prioritysets the priority of the interrupt. The values it can take are port specific, but higher values always represent higher priority.
wakeSelect this interrupt to wake up the power mode of the system. It can bemachine.IDLE,machine.SLEEPormachine.DEEPSLEEP。These values can also be used for
ORoperations, which can interrupt the pin in various power consumption modes.
This method returns a callback object.
>>> from mpython import *
>>> button_a.irq(trigger=Pin.IRQ_FALLING, handler=lambda p:print("button-a press!"))
touchPad_[ ] object
There are 6 touchpad on the mPython Board touchPad_P/Y/T/H/O/N。
-
touchPad_[P,Y,T,H,O,N].read()
Return touch value
>>> touchPad_P.read()
>>> 523
rgb object
mPython Board built-in with three WS2812 LED. The RGB object is a derivative of neopixel, methods of inheriting neopixel. For more application, see neopixel .
-
rgb.write()
Write data to RGB LEDs。
Hint
Write RGB color values by assigning values to rgb[n] list. Such as, rgb[0]=(50,0,0)
from mpython import *

rgb[0] = (255, 0, 0)  # set to RED for full brightness
rgb[1] = (0, 128, 0)  # set to GREEN for half brightness
rgb[2] = (0, 0, 64)   # set to BLUE for a quarter of brightness

rgb.write()
-
rgb.fill(rgb_buf)
Fill all LED pixels.
-
rgb.brightness(brightness)
Brightness adjustment, range 0~1.0
OLED object
The OLED object is a derivative of framebuf, inheriting the method of framebuf. For more application, see framebuf .
-
oled.poweron()
Power ON the OLED panel.
-
oled.poweroff()
Power OFF the OLED panel.
-
oled.contrast(brightness)
Set the display brightness。
brightnessbrightness, range 0~255
-
oled.invert(n)
Flip the pixels. When n=1, the unfilled pixels are lit-up, and the filled pixels are off. Otherwise When n=0. The default start is to fill the pixels and light up.
-
oled.DispChar(s, x, y, mode=TextMode.normal, auto_return=False)
OLED panel text display. Apply Google Noto Sans CJK open-source sans serif font. Font height 16 pixels, supports English, Simplified Chinese, Traditional Chinese, Japanese and Korean languages.
Returns the binary (the total pixel width of the character, the x, y coordinates of the subsequent display).
s-Text to display.
x、y- The upper left corner is the text start point coordinate.
mode- Set the text mode, the default is TextMode.normal
TextMode.normal- equals to 1 . In normal mode, the text is displayed in white and the background is black.TextMode.rev- equals to 2 . Reverse mode, the text is displayed in black, and the background is white.TextMode.trans- equals to 3 . Transparent mode, transparent text means that the text is written on top of what is already visible in the display. The difference is that the content on the previous screen can still be seen, while for normal, the background will be replaced by the currently selected background color.TextMode.xor- equals to 4 . XOR mode, if the background is black, the effect is the same as the default mode (normal mode). If the background is white, the text is reversed.
auto_return- auto return,When the display string exceeds the width of the display, it will wrap automatically.
-
oled.show()
Send frame buffer to OLED display.
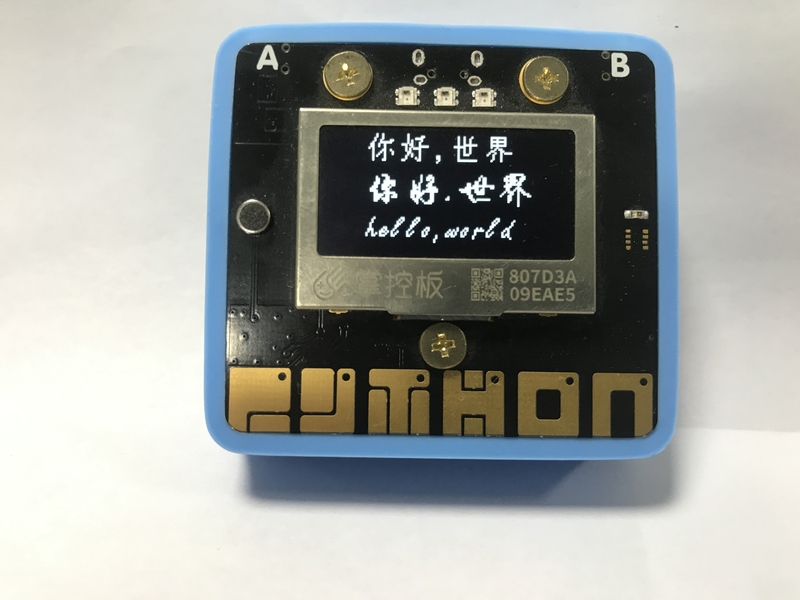
1 2 3 4 5 6 7 | from mpython import *
oled.DispChar('你好世界', 38, 0)
oled.DispChar('hello,world', 32, 16)
oled.DispChar('안녕하세요', 35, 32)
oled.DispChar('こんにちは世界', 24, 48)
oled.show()
|
1 2 3 4 5 6 7 8 9 10 11 12 13 14 15 16 17 18 19 20 21 | # 打字效果
from mpython import *
oled.fill(0)
# 显示的字符串
_str = "掌控板是创客教育专家委员会、猫友汇、广大一线老师共同提出需求并与创客教育行业优秀企业代表共同参与研发的教具、学具,是一块为教育而生的开源硬件,也是一个公益项目。mPython掌控板是一块MicroPython微控制器板,它集成ESP32高性能双核芯片,使用当下最流行的Python编程语言,以便您轻松地将代码从桌面传输到微控制器或嵌入式系统。"
# 起点坐标
axis = (0, 0)
# 逐字显示,根据返回的坐标续接显示
for c in _str:
response = oled.DispChar(c, axis[0], axis[1])
char_width = response[0]
axis = response[1]
oled.show()
# 满屏时,清屏
if axis[1] >= 64 - 16 and char_width >= 128-axis[0]:
print('Clear screen')
oled.fill(0)
|
-
oled.DispChar_font(font, s, x, y, invert=False)
Custom font display. Users can use Python script for otf 、 ttf standard font files on the PC according to their own need font_to_py.py turn to output Python source code with font bitmap, and call to use. Returns the binary (the total pixel width of the character, followed by the displayed x, y coordinates).
font- Font object. font_to_py.py put the python source code obtained from script conversion into the file system. Note that font file must be imported before using the function.s- Displayed stringx、y- The upper left corner is the text start point coordinate.invert- Display pixel flip。
1 2 3 4 5 6 7 8 9 10 11 12 13 14 15 16 17 18 | # The MIT License (MIT)
# Copyright (c) 2019, Tangliufeng for labplus Industries
# 掌控板oled.DispChar_font()自定义字体显示的简单示例
from mpython import *
# 导入转换好的字体
import simfang16
import freescpt18
import stxingkai20
# 使用自定义字体显示
oled.DispChar_font(simfang16,'你好,世界', 23, 0)
oled.DispChar_font(stxingkai20,'你好,世界', 23, 21)
oled.DispChar_font(freescpt18,'hello,world', 23, 42)
oled.show()
|
font_to_py.py script instructions
- This script requires Python 3.2 or higher. Depends on freetype python package. Installation method, pip3 install freetype-py
- By default, only the ASCII character set( chr(32) to chr(126) characters) is converted. Through the command line parameter -c, modify this range as needed to specify any Unicode character set, you can define non-English and non-contiguous character sets.
- oled.DispChar_font() function only supports hmap horizontally mapped fonts, so when converting, you need to use the command line parameter -x to permanently convert to horizontal mapping.
- Firmware parameters. Font file path, converted font height, output file path. Such as: font_to_py.py FreeSans.ttf 20 myfont.py
Use font_to_py.py script to convert fonts on PC:
# Convert height to 16 pixels contains only ASCII character set
font_to_py.py -x FreeSans.ttf 16 myfont.py

# The conversion height is 16 pixels to specify the Unicode character set, and the character set specified for you after the -c parameter
font_to_py.py -x simfang.ttf 16 simfang.py -c  ¬!"#£$%&'()*+,-./0123456789:;<=>?@ABCDEFGHIJKLMNOPQRSTUVWXYZ[\]^_`abcdefghijklmnopqrstuvwxyz{|}~°Ωαβγδθλμπωϕ£
The function of this function is realized, the reference comes from peterhinch/micropython-font-to open source project, more details about font_to_py.py Instructions, you can go to this project for more information.
-
oled.fill(c)¶ Fill the entire frame buffer with the specified color. When
cis 1, the pixel is on; whencis 0, the pixel is off.
-
oled.circle(x, y, radius, c)
Draw a circle
x、y- the upper left corner as the starting point coordinate.radius- Radius of circlec- when it is 1, the pixel is on; whencis 0, the pixel is off.
-
oled.fill_circle(x, y, radius, c)
Draw a solid circle
x、y- the upper left corner as the starting point coordinate.radius- Radius of circlec- when it is 1, the pixel is on; whencis 0, the pixel is off.
-
oled.triangle(x0, y0, x1, y1, x2, y2, c)
Draw a triangle
x0、y0- Vertex coordinates on the triangle.x1、y1- Coordinates of left vertex of triangle.x2、y2- Coordinates of the left vertex of the triangle.c- when it is 1, the pixel is on; whencis 0, the pixel is off.
-
oled.fill_triangle(x0, y0, x1, y1, x2, y2, c)
Draw a solid triangle
x0、y0- Vertex coordinates on the triangle.x1、y1- Coordinates of left vertex of triangle.x2、y2- Coordinates of left vertex of triangle.c-when it is 1, the pixel is on; whencis 0, the pixel is off.
-
oled.bitmap(x, y, bitmap, w, h, c)
Draw a bitmap pattern
x、y- the upper left corner as the starting point coordinatebitmap- btyearray byte array of pattern bitmapw- Pattern widthh- Pattern heightc- When 爱他1, the pixel lights up;
-
oled.RoundRect(x, y, w, h, r, c)
Draw arc rectangle
x、y- The upper left corner is used as the starting point coordinatew- Pattern widthh- Pattern heightr- Arc radiusc- When it is 1, the pixel is on; whencis 0, the pixel is off.
i2c object
The mPython Board has been instantiated in the I2C class, P19 and P20 are the SCL and SDA pins of I2C. I2C devices can be connected to the I2C bus of the mPython Board for operation.
Deatils of read and write I2C operations, see machine.I2C 模块或 I2C basic tutorial chapter.
MPythonPin class
-
class
mpython.MPythonPin(pin, mode=PinMode.IN, pull=None)
CReate Pin object
pinmPython Board pin number definition, see mPython Board pins definition 。modepin mode. Before setting, defahlt is mode = PinMode.INPinMode.INequals to 1,digital input modePinMode.OUTequals to 2,digital output modePinMode.PWMequals to 3,analog output modePinMode.ANALOGequals to 4,analog input modePinMode.OUT_DRAINequals to 5,Open-drain output mode
pullspecifies whether the pin is connected to a resistor, which can be one of the following:None- No pull-up or pull-down resistorsPin.PULL_UP- Pull-up resistor enablePin.PULL_DOWN- Pull-down resistor enable
Example:
>>> from mpython import MPythonPin       # import MPython moduel
>>> P0=MPythonPin(0,PinMode.IN)          # create pin 0 object, set digital input mode
-
MPythonPin.read_digital()
Returns the level value of this IO pin. 1 represents high level, 0 represents low level
-
MPythonPin.write_digital(value)
IO pin output level control. value =1 output high level, value =0 output low level.
-
MPythonPin.read_analog()
Read ADC and return the read result, the returned value is between 0 and 4095.
-
MPythonPin.write_analog(duty, freq=1000):
Set the duty ratio of the output PWM signal.
duty0 ≤ duty ≤ 1023freqPWM frequency, 0 < freq ≤ 0x0001312D(decimal base :0 < freq ≤ 78125)
-
MPythonPin.irq(handler=None, trigger=Pin.IRQ_RISING):
If the pin mode is configured as IN , you can configure the interrupt handler that is called when the trigger source of the pin is active.
Parameter:
handleris an optional function that is called when the interrupt is triggered.
triggerconfigures events that can trigger an interrupt. Value could be:
Pin.IRQ_FALLINGfalling edge interruptPin.IRQ_RISINGrising edge interruptPin.IRQ_LOW_LEVELlow level interruptPin.IRQ_HIGH_LEVELhigh level interruptThese values can be used to perform
ORoperations together to trigger multiple events.
WiFi class
Provide convenient WiFi connection network or wireless AP function. Note that turning on the WiFi function will increase power consumption.If not in use, turning off WiFi can reduce power consumption.
-
class
mpython.wifi
Build WiFi object and create sta object and ap object. See network more application of modules.
- STA is used by clients to connect to routers to connect to the network。
- AP is used to mPython Board as a wireless AP access method
-
wifi.connectWiFi(ssid, password, timeout=10)
Connect WiFi network
ssid-WiFi network IDpassword-WiFi Passwordtiemout- Link timeout, default 10 seconds
-
wifi.disconnectWiFi()
Disconnect WiFi network connection
-
wifi.enable_APWiFi(essid, password, channel=10)
Open WiFi wireless AP mode
essid- create WiFi network IDpassword- Passwordchannel- Set WiFi channel,channel 1~13
-
wifi.disable_APWiFi()
Turn off wireless AP